Learning Video on the Sony A6700
Teaching myself to shoot video on the A6700 in Bodrum, scene by scene. What I set, what I learned, and what I got wrong.
Introduction
I already shoot photos on the A6700. Video is different. I wanted to film a compilation of Bodrum in March 2026, roughly 60 to 90 seconds of clips cut together with music. Not a vlog. Not a tutorial. Just places I go, shot well enough to feel intentional.
What I did not expect was what video would teach me about myself.
Photography taught me to see light, composition, and technical settings. Video taught me to see moments, timing, and human behaviour. Somewhere between the first shaky market footage and the twelfth scene, the compilation stopped being about places and started being about life. The simit truck interaction. Murat smoking a cigarette at 135mm. The old woman selling bracelets at Kapıkırı. A kid herding cows up a hill. The 85mm candid shots of strangers drinking coffee, unaware they were being filmed. I started this wanting to film Bodrum. I ended up wanting to film the people in it.
The camera was bought for AWS demo videos. Photography happened by accident. Video revealed something photography could not: that I am drawn to people and moments more than landscapes. The places are the stage. The people are the performance. I only discovered this by doing it, reviewing the footage, and noticing what I kept coming back to.
This post documents what I learned scene by scene, starting from knowing very little about video. Every setting, every mistake, every realisation is written down as it happened. The fundamentals section covers the principles that apply to every scene. The scenes themselves cover what changed depending on the location and conditions.
What this post is
A learning journal. I am teaching myself video by shooting real scenes and documenting what works and what does not. It is written in the order I learned things, not the order a textbook would teach them.
Fundamentals
These are the principles that apply to every scene. I learned most of them by getting things wrong first.
Camera Settings Baseline
Every scene starts from this baseline. Individual scenes adjust aperture, ISO, and ND based on conditions, but these stay locked.
| Setting | Value | Why |
|---|---|---|
| Mode | Manual | Full control over exposure. Auto modes cause inconsistency between clips. |
| Resolution | 4K | Highest quality the A6700 offers. More detail, more flexibility in the edit. |
| Frame rate | 25fps | PAL standard for UK/Europe. Determines shutter speed baseline. |
| Shutter speed | 1/50 | 180-degree rule: double the frame rate. Gives natural motion blur that looks cinematic. |
| Picture profile | Cinetone | Natural colour straight out of camera. Minimal grading needed. Good enough for a compilation without adding post-production complexity. |
| Zebras | On at 100 | Shows where highlights are clipping on screen. If zebras flash on the subject, exposure is too high. |
| Focus | Continuous AF, Wide area | For scenes and locations, not people. Wide area keeps the scene sharp. Human tracking hunts for faces and shifts focus to people walking through the frame. |
| DRO | Off | Dynamic Range Optimiser is a photo feature. In video it does not do much and can interfere. |
Why not S-Log:
S-Log 3 captures more dynamic range but the footage looks flat and washed out. Every clip needs colour grading in post or it looks terrible. Cinetone gives usable footage straight from camera. Learn S-Log later when the shooting side is comfortable and there is time to invest in colour grading. One new thing at a time.
Why 25fps and not 30fps:
PAL region. Also, 25fps with 1/50 shutter gives slightly more light per frame than 30fps at 1/60, which helps in lower light.
Recording Format
What I used for this trip:
XAVC S 4K at 60Mbps, 4:2:0, 8-bit. This was the default setting and I did not change it. The footage looked good and I was happy with the results, but this was the lowest quality 4K option on the camera. I left quality on the table without knowing it.
What to use next time:
XAVC HS 4K at the highest bitrate available, 4:2:2, 10-bit. If XAVC HS does not offer 4:2:2 10-bit at 25fps, use XAVC S 4K at 140Mbps, 4:2:2, 10-bit instead. Same for 50fps slow motion: highest bitrate, 4:2:2, 10-bit.
| What I used | What to use next time | |
|---|---|---|
| Format | XAVC S 4K | XAVC HS 4K |
| Bitrate | 60Mbps | Highest available (140-200Mbps) |
| Colour sampling | 4:2:0 | 4:2:2 |
| Colour depth | 8-bit (16 million colours) | 10-bit (1 billion colours) |
| File size per minute | Smaller | Roughly 2-3x larger |
| Colour grading flexibility | Limited, corrections can cause banding | Smooth, more room to push adjustments |
Why it matters:
The 10-bit 4:2:2 gives more colour data for the ND filter correction preset in Premiere Pro. At 8-bit, pushing temperature and tint adjustments can cause visible banding or colour stepping. At 10-bit it stays smooth. The higher bitrate also means fewer compression artefacts, especially in scenes with lots of movement like waves, leaves, or people walking.
The trade-off:
File size. At 140Mbps the 256GB card holds roughly 20 minutes of 4K instead of 45 minutes. But at 8 to 15 second clips, that is hundreds of clips. Not a concern.
The formats explained:
| Format | Codec | Best for |
|---|---|---|
| XAVC HS 4K | H.265 | Best quality-to-file-size ratio. Recommended default. |
| XAVC S 4K | H.264 | Good quality, widely compatible. What I used for this trip. |
| XAVC S-I 4K | H.264 All-Intra | Best for editing, each frame compressed individually. Very large files. Needs V90 card. |
Slow Motion
For specific moments like waves, water, or someone diving into the sea.
| Setting | Value |
|---|---|
| Frame rate | 50fps |
| Shutter speed | 1/100 |
The 180-degree rule still applies. Double the frame rate, double the shutter speed. At 50fps with 1/100 shutter, the footage plays back at half speed when dropped into a 25fps timeline. 10 seconds of recording becomes 20 seconds of slow motion.
Important: Switching from 25fps to 50fps loses a stop of light because the shutter goes from 1/50 to 1/100. Open the aperture or dial the ND back to compensate. Always check exposure after changing frame rate.
Switch to 50fps for the specific clip, then back to 25fps. Do not shoot the whole scene at 50fps.
White Balance
Do not use auto white balance for video. AWB shifts between clips and when they are cut together in a compilation the colour temperature jumps from shot to shot. Set it manually and change it when conditions change.
| Time (Bodrum March) | Condition | White Balance |
|---|---|---|
| 7:30 to 8:30 | Golden hour morning | 5200K |
| 8:30 to 5:30 | Daytime | 5600K |
| 5:30 to 7:10 | Golden hour evening | 5200K |
| 7:10 to 7:40 | Blue hour | 5200K |
| Indoors anytime | Warm artificial light | 3200K |
Four situations, three values. Lock and forget. Do not experiment with white balance mid-shoot. Every clip at a different white balance means every clip needs individual correction in the edit to match the others. Consistency on camera is more important than perfection. The time for creative white balance decisions is in post where they can be undone.
I learned this the hard way. I played around with white balance across the first few scenes and it created unnecessary work matching clips in Premiere Pro.
Editing in Post — What to Think About While Shooting
The editing stage is easier when the footage is consistent coming off the camera. Most of the effort in post comes from fixing problems that could have been avoided while shooting.
White balance consistency.
Already covered above. Lock it per condition. Clips at random white balance values are fixable in Premiere Pro with Lumetri Color temperature adjustments, but it is tedious across 40 to 50 clips.
Cinetone is a starting point, not the final look.
Cinetone looks good out of camera but it is a natural, slightly understated profile. Clips may look a little more muted than what the eye saw. This is normal. In Premiere Pro, small adjustments in Lumetri Color bring clips to life:
| Adjustment | What it does | When to use |
|---|---|---|
| Vibrance | Makes dull colours more vivid without over-cooking strong ones | First thing to try. Safer than saturation. |
| Contrast | Adds separation between light and dark | Washed or flat looking clips. |
| Saturation | Makes all colours more vivid | Clips that still look muted after vibrance. Use sparingly. |
| Temperature | Shifts warm or cool | Matching clips shot at different white balance values. |
| Exposure | Brightens or darkens overall | Clips that are slightly over or under. |
The reference clip method.
Find the best looking clip, the one that looks exactly right. Use that as the reference. Go through the others and nudge contrast, vibrance, and temperature until they match. Small adjustments. The goal is consistency across the compilation so clips cut together without colour jumps.
What helps in the edit starts on camera:
| On camera | Why it matters in post |
|---|---|
| Locked white balance | Less colour matching work. |
| Consistent ND filter setting | Less colour cast correction. |
| Front-lit shots | Rich colour that needs minimal adjustment. |
| 8 to 15 second clips | Room to trim the shaky start and end. |
| Zebras checked before recording | No blown highlights to rescue. |
| Clean lens | No soft haze to wonder about later. |
Screen vs Viewfinder
Screen is the default for framing. Flip it out and use it for composition, especially when the camera is on a tripod or at a low angle.
Viewfinder is better in two situations. First, bright sunlight where the screen washes out and colours are hard to judge. The viewfinder is shielded and shows accurate colour. Second, when extra stability is needed, because pressing the camera against your face adds a contact point that steadies handheld shots.
For outdoor shooting in Bodrum sun, the practical workflow is: frame the shot on the screen, then check colour in the viewfinder before hitting record.
Light Direction
The sun is the main light source. Where it is relative to me and the subject changes everything about how the shot looks. This is more important than any camera setting.
Front light. Sun behind me, lighting the subject directly. Colours are rich, detail is clear, contrast is strong. The Bodrum sea looks turquoise, white walls look crisp, food looks vibrant. This is the safest direction. Most compilation clips should be front lit.
Side light. Sun to my left or right. This creates shadows and depth. A building with side light has texture because one side is bright and the other falls into shadow. Morning and late afternoon sun naturally gives side light because the sun is lower and coming from an angle. More interesting than front light because the shadows give the image shape.
Back light. Sun in front of me, behind the subject. The subject goes dark or becomes a silhouette. Edges glow. Water sparkles. This is the golden hour look and it works when the sun is low and warm. It does not work at midday when the sun is high and harsh because that just produces glare and haze with no mood. Shooting into the sun also causes light to scatter through the ND filter, making the image worse.
How to check: Before framing a shot, look at where my shadow falls. If my shadow is behind me, the sun is in front of me and I am shooting into the light. Turn around and my shadow points toward the subject, which means front light.
For a compilation: Roughly 70% front and side lit shots for clean colour. 30% backlit shots at golden hour for drama. That mix cuts together well.
I figured this out at Akyarlar beach. Some clips had rich colour and others looked washed. I thought it was the ND filter. It was the sun. The rich ones were front lit. The washed ones were shot facing the sun.
When to Shoot
I should have learned this before picking up the camera. Light direction matters, but time of day matters just as much. The sun directly overhead at midday produces flat, harsh, shadowless light that makes everything look washed. The same scene at 6pm looks cinematic because the sun is low, warm, and casting long shadows.
This applies to all shots. Beach, market, street, harbour. Light is light.
Bodrum in March: sunrise 7:30, sunset 7:10pm.
| Time | Light | What to Do |
|---|---|---|
| 6:30 to 8:30 | Golden hour, warm low sun, long shadows | Best light of the day. Shoot everything. Wides, details, walking shots. Colours are rich, shadows give depth. |
| 8:30 to 10:30 | Morning light, sun still low-ish | Good light. Still worth shooting. Side light on buildings and streets. |
| 10:30 to 4:00 | Midday to early afternoon, sun high and harsh | Weakest light. Flat, no shadows, washed colours. Shoot close-up details if anything. Otherwise eat, swim, explore, scout locations for later. |
| 4:00 to 5:30 | Afternoon, sun getting lower | Light improving. Start shooting again. Good for beaches and streets. |
| 5:30 to 7:10 | Golden hour, warm low sun, long shadows | Best light of the day again. Shoot everything. This is when the compilation clips will look their best. |
| 7:10 to 7:40 | Blue hour, sun below horizon, soft cool light | Beautiful even light, no harsh shadows. Good for mood shots, harbour, town scenes. Short window so be ready. |
The middle of the day is for living. The edges of the day are for filming. If I only have energy to shoot once, pick the evening golden hour. The sun is lower, warmer, and I have already scouted locations during the day so I know exactly where to go and what to shoot.
I shot my first two scenes without knowing any of this. The market was fine because it was covered and the light was mixed regardless of time. The beach at 4pm was on the edge of good light, but some clips suffered from harsh overhead sun and backlight. If I had gone at 5:30 instead, the same shots would have looked better with no change in settings.
Filming Direction at Sunrise and Sunset
The actual sunrise or sunset is one or two shots. Everything else should face the other way.
Sunrise:
| Time | Direction | What |
|---|---|---|
| 7:00 to 7:30 | Toward the sun | Blue hour then one or two clips of the actual sunrise. Silhouettes, warm glow on the horizon. |
| 7:30 to 8:30 | Away from the sun | Front-lit golden footage. The bulk of the clips. Rich colour, long shadows, warm light hitting everything. |
| 8:30 to 9:00 | Any direction | Light still good but climbing. Last shots before it gets too high. |
Sunset:
| Time | Direction | What |
|---|---|---|
| 5:30 to 6:45 | Away from the sun | Front-lit golden footage. The bulk of the clips. Rich colour, strong contrast. |
| 6:45 to 7:10 | Toward the sun | Backlit dramatic shots. Silhouettes, sun on water, golden flare. One or two strong clips. |
| 7:10 to 7:30 | Any direction | Blue hour. Even soft light everywhere. Mood shots. |
One or two clips of the sun itself. Then turn around and spend the rest of the time filming what the light is hitting. That is where the strong footage is.
Note
Mountains can cut sunrise and sunset short. The sun may disappear behind mountains before the listed sunset time, or arrive later than listed sunrise. Log the actual times for each location.
Stay 20 minutes after sunset
The afterglow can be more dramatic than the sunset itself. The sun drops, the sky goes flat for a moment, then 10 to 20 minutes later the clouds and sky light up pink and red from light bouncing off the atmosphere. Most people pack up when the sun disappears and miss the best part. At Kapıkırı village the sunset was average but the pink sky 20 minutes after was stunning. Boats on water, castle in the background, pink skies. That was the shot, not the sunset.
Aperture
The lens sweet spot for sharpness is f/8 to f/11. In theory, past f/11 diffraction softens the image on APS-C sensors. I tested this by shooting the same scene at f/11 and f/16 and comparing on my MacBook Pro. I could not see a difference in sharpness. For video at 3 to 5 second clips in a compilation, f/16 is usable on my setup.
However, f/16 without the ND filter produced better colour than f/8 with the ND filter. That matters more than a theoretical sharpness difference I cannot see.
| Condition | Aperture |
|---|---|
| Bright outdoor sun (tripod) | f/8 to f/11, up to f/16 if avoiding ND |
| Bright outdoor sun (handheld) | f/5.6 to f/8 |
| Mixed light (covered areas, shade) | f/4.0 to f/5.6 |
| Low light (indoors, evening) | f/3.5 to f/4.0 (wide open) |
The order for reducing light in bright sun:
- f/8, no ND
- f/11, no ND
- f/16, no ND (cleaner colour than f/8 with ND)
- f/11 with ND filter and Premiere Pro correction preset applied in post
- If that is still not enough, stop shooting. It is midday.
At wide focal lengths like 18mm, depth of field is naturally deep even at f/4.0, so everything in the scene stays in focus. Aperture choice at wide angles is about light, not depth of field.
Person in the scene vs person as the subject. This changes the aperture.
| Question | Aperture | Example |
|---|---|---|
| Am I filming a place where people happen to be? | f/8 to f/11 | Simit truck, market, side street, marina. Everything sharp. The location is the subject. |
| Am I filming a person and the place is just the backdrop? | f/4.5 to f/5.6 | Beach portrait, fisherman, cafe owner. Person sharp, background soft. The person is the subject. |
Most of the compilation is about places. People walk through the frame but the location is the point. f/8 to f/11 keeps everything sharp and the viewer sees the whole scene. That is correct.
When a clip is specifically about a person, open up to f/4.5 to f/5.6 at 55 to 85mm. The background goes soft and the viewer’s eye is drawn to the person. The place becomes context, not the subject.
Same logic applies to animals. The cat on the tree at 135mm is about the cat, not the tree. Open up for subject separation.
The question to ask before each clip: is this about the place or about the person in it? The answer decides the aperture.
Focal length and subject separation
The more zoomed in, the more the person stands out from the background. But the trade-offs increase too.
| Focal length | Widest aperture | Background blur | Good for | Not good for |
|---|---|---|---|---|
| 18 to 35mm | f/3.5 to f/4 | Minimal. Everything mostly sharp. | Scenes, places, walking shots, person in environment. | Portraits. Person doesn’t stand out. Background competes for attention. |
| 50mm | f/4.5 | Slight. Starting to separate. | Environmental portrait. Person with context visible. | Tight portraits. Not enough compression. Background still too present. |
| 85mm | f/5.6 | Noticeable. Person stands out. | Portraits. Candid people shots from distance. | Walking shots. Too tight, every step amplified. Wide scenes where context is needed. |
| 135mm | f/5.6 | Strong. Background falls away. | Tight headshots. Maximum separation. Intimate close-ups. | Anything with movement from me. Must be completely still. Need to stand far back so tight spaces don’t work. Lose all context of where the person is. |
50mm is the crossover point. Below it is scene territory. Above it is portrait territory. 85 to 135mm is where this lens gives the most subject separation.
Mixing both in the edit
A wide shot of the simit truck at 18mm f/8 shows the scene. Then cut to the simit guy at 85mm f/5.6 and suddenly it’s about him. Wide for context, tight for emotion. The contrast between the two is what makes both clips stronger. The same location can produce both a scene clip and a portrait clip. Two different stories from one spot.
The ND Filter
The K&F Concept Nano-X 55mm variable ND (ND2 to ND400, 9 stops) is for bright outdoor conditions. It lets me keep the 180-degree shutter rule in full sun without overexposing.
The definitive test:
I shot the same scene with blue sky and sea at f/11 without the ND filter, then at f/11 with the ND filter at each of the 7 marks raising ISO to compensate, then at f/16 without the ND. The results:
| Clip | Result |
|---|---|
| f/11 no ND | Best colour. True reference. |
| f/16 no ND | Same colour as f/11. No visible diffraction difference. |
| All 7 ND marks | Consistent colour shift across every stop. Washed compared to no-ND clips. |
The colour shift is consistent, not worse at higher stops. The filter adds a warm cast at every setting. This means it is a predictable problem with a simple fix.
The Premiere Pro fix:
The ND colour shift can be corrected in post with a single preset. I compared an ND clip and a non-ND clip of the same scene side by side in Lumetri Color and adjusted until they matched:
| Adjustment | Value |
|---|---|
| Temperature | -20 |
| Tint | +5 |
| Vibrance | +15 |
These numbers correct the warm cast and bring the ND footage back to match the non-ND footage. Save as a preset in Lumetri, apply to every ND clip in the compilation. One fix, done in seconds per clip.
When to use the ND filter: Only when f/16 at ISO 100 is still overexposed. That means very bright midday sun, which is also the worst time to shoot. In practice, f/11 to f/16 without the ND handles most conditions during golden hour and morning or afternoon light. The ND is a last resort, not a default.
The filter itself: No hard stops. The ring does a full 360 with 7 marks. No way to know the exact ND setting. The colour shift is consistent across all stops, not just the high end.
Stuck filter prevention: Screw on until snug, then stop. Finger tight, not force tight. Heat expands metal and two different metals expanding at different rates in the sun will bind. If it gets stuck, dial to ND2 and keep shooting. Deal with removing it later when it has cooled. A 55mm filter wrench (about £5 to £10 on Amazon) solves it permanently.
Lens Hood
The Sony ALC-SH153 blocks stray light from hitting the front element at an angle. This reduces flare and haze, improves contrast, and makes colours slightly more saturated. It also physically protects the front element from bumps and fingerprints.
Use it all the time. It is free image quality. The only time to take it off is when the ND filter is on because the hood does not fit over the ND filter on this lens.
Some of the washed-out clips I was troubleshooting earlier may have been partly caused by no lens hood, on top of the ND filter colour shift and light direction. Another factor I was not aware of.
The trade-off with the ND filter:
Hood on means no ND. ND on means no hood. Given that the ND shifts colour anyway and needs correction in post, the practical approach is: use the hood by default, only take it off and put the ND on when f/16 at ISO 100 is still overexposed.
The Exposure Meter
The +/- scale at the bottom of the screen shows how far the current settings are from what the camera thinks is correct exposure. Zero means the camera agrees.
Use it as a starting point, not as gospel. The camera meters for middle grey, which means it tries to make everything averagely bright. A scene with lots of white like Bodrum walls will cause the meter to underexpose. A dark scene will cause it to overexpose.
The workflow: Get the meter near zero, check zebras on the subject, check histogram is not clipping on either end. If all three look good, shoot. If the meter says zero but zebras are flashing on the subject, trust the zebras and adjust. Zebras show what is actually happening. The meter shows what the camera thinks should happen. They are not always the same.
Composition
Rule of thirds. Imagine the screen divided into a 3x3 grid. Place the subject on one of the intersections, not dead centre. For a close-up of oranges, frame them in the lower left or lower right third with the stall and background filling the rest.
Do not zoom while recording. It looks amateur and jerky on a lens ring. If I want a tighter shot, stop recording, zoom to the focal length I want, then start a new clip. Every clip is one fixed focal length.
Camera height. The height changes how the viewer feels about the subject. Before hitting record, ask: how do I want this to feel?
| Height | Feeling | When to use | Example |
|---|---|---|---|
| Eye level | Neutral, honest, normal | Default for most shots | Market stalls, streets, mid shots |
| Low angle, looking up | Big, powerful, dramatic | When the subject should feel larger than life | Mosque minaret, building facade, boat hull, beach stretching out |
| High angle, looking down | Small, intimate, detailed | Details and showing layout from above | Food on a plate, shells on sand, street from a balcony |
Eye level is the default. Two or three low angles per scene for variety. A high angle when there is a balcony or elevated spot with a good view down.
Arriving at a New Location
Arrive. Look around. Camera stays down. Notice where the light is, what catches your eye, where life is happening.
Then shoot it three ways before moving on:
- Wide at 18mm. The whole scene. Where we are.
- Mid at 35 to 50mm. A subject in context. What this place feels like.
- Detail at 85 to 135mm. Something specific. The texture, the colour, the moment.
Check your shadow for light direction. Check the sky for haze. Check the lens is clean.
If there is a person worth filming as the subject, open up to f/5.6 and zoom to 85mm or above. If the scene is the subject, stay at f/8 to f/11.
If something is moving, hold still and let it pass through the frame. If nothing is moving, hold still anyway. I am the tripod. The world is the content.
Shot Types
A good compilation is not just nice locations. It is how the shots vary from clip to clip. If every shot is the same distance, same angle, same movement, it gets monotonous. The variety comes from mixing these types.
Establishing wide (18mm). Sets the scene. A bay, a coastline, a market from the entrance. Tripod. Hold 10 to 15 seconds. These open a sequence or transition between locations.
Mid shot (35 to 50mm). Shows a subject in context. A stall with people around it. A cafe table with the sea behind. Tells the viewer what the place feels like at human scale.
Close-up detail (85 to 135mm). The part most people forget. A cup of Turkish coffee. Spices at a market. Water lapping against stone. A cat on a wall. These make a compilation feel personal rather than like a tourism advert. Step back 2 to 3 metres for the focal length to work. Frame the subject in the lower third. Plant feet and hold.
Low angle. Crouch down and shoot along the ground. A street, a beach, a waterfront from a different perspective. Same location, free variety.
Walking shot (18mm only). A slow walk into a new location. Camera straight ahead, eye level. Do not look left or right. The wide angle captures everything either side. The movement is the feet, not the camera. Half normal walking speed.
The discipline: When arriving at a location, shoot it three ways before moving on. One wide, one mid, one detail. That alone gives enough variety for a strong edit.
Rough split for 40 to 50 clips: 8 to 10 wide, 12 to 15 mid, 10 to 12 close-up details, the rest as movement, low angles, or variations.
When to Move the Camera and When to Hold Still
Most of the compilation should be static shots. Well-framed, different angles, cut together. That is the standard for polished video. Each clip is a locked-off composition where the subject or the environment does the moving, not the camera. Commercials work this way. It looks professional because it is controlled and intentional.
The principle:
I am the tripod. The world is the content. The market, the people, the colours, the movement, all of that is already happening without me doing anything. My only job is to hold the frame steady and let it play out. Beginners move the camera to make it interesting. Good footage is interesting because of what is happening inside a steady frame.
Plant myself and hold. Let the business of the scene create the action. A vendor arranging fruit. People browsing past. Waves rolling in. All of that is already there. I do not need to chase it with the camera. I just need to frame it and stay still.
Fight the urge to keep moving. Standing still feels like doing nothing, but a steady 8-second hold on a well-framed subject is more powerful in the edit than constant movement.
For the compilation:
80% static shots, 20% movement. The one or two walking clips give the edit energy and transition between locations, but they work because everything around them is steady.
When handheld movement makes sense for a compilation:
Walking into a new location as an entrance shot, or a slow reveal walking around a corner to show a view. That is it.
When active tracking and movement make sense (not for this compilation):
Sports, events, and action. Filming a friend playing football where the subject is moving and the camera needs to follow. Gym filming where I am walking around someone during a lift. Jiu-jitsu mat-side where the action is unpredictable. Weddings, concerts, behind-the-scenes footage. The common thread is the subject is moving and the camera needs to move with them. For a location compilation where everything is still, the camera should be still.
Handheld Technique
Body position:
Bend knees slightly, tuck elbows in, hold the camera close to the body. Breathe out gently and hold. The body is the stabiliser.
Walking:
Small steps, roll from heel to toe. Imagine carrying a full cup of coffee without spilling it. The legs are the shock absorbers. Keep the upper body level and let the knees absorb the bounce. Half normal walking speed.
Focal length matters:
Wide for movement, tight for still. At 18mm, a slow walk with IBIS on looks smooth. At 85 to 135mm, every small hand wobble is amplified. At tight focal lengths, plant feet and do not move.
SteadyShot (IBIS):
On for all handheld work. Off on the tripod. IBIS on a tripod can introduce micro-jitter as the system tries to correct vibrations that are not there.
Wind exception:
In windy conditions on a tripod, try IBIS on. Wind physically shaking the tripod is real vibration and IBIS can dampen it. I noticed this at Kapıkırı village where the wind was moving the camera on the tripod during a long recording. IBIS on would have helped smooth that out. So the rule is: IBIS off on a stable tripod, IBIS on if the wind is shaking it.
The nervousness factor:
I was walking too fast and gripping too tight in the first scene, partly from being nervous about filming in public. Slowing everything down, slow steps, slow hands, slow breathing, made a noticeable difference. Relaxing the shoulders and loosening the grip helps.
Tripod vs Handheld Quick Reference
The tripod is not needed for every shot. It is justified for long holds over 10 seconds, slow motion, tight focal lengths, and shots where I am in the frame. Everything else is handheld with IBIS on.
If I am at a specific location and planning to stay, set up the tripod for the wide shot, then take it off and go handheld for the rest. If I am walking through a town and stopping at things that catch my eye, leave it in the bag. The tripod slows things down and kills spontaneity. Some of the best clips come from things noticed in passing.
| Focal Length | Handheld Still | Handheld Walking | Tripod |
|---|---|---|---|
| 18mm | Easy | Easy | Best for long holds (10-15 sec), slow motion, or when I am in the shot |
| 35mm | Easy | Possible, go slow | Not needed |
| 50mm | Comfortable | Risky, avoid | Not needed |
| 85mm | Doable if well braced | Do not do it | Recommended |
| 100-135mm | Tough, keep clip short | Do not do it | Use it |
Clip Length
Shoot each clip for 8 to 15 seconds, even though only 3 to 5 seconds will be used in the final edit. The extra time gives room to trim the start and end where there is usually camera shake from pressing record and stopping. It also gives options in the edit for where to cut.
Wide establishing shots: 10 to 15 seconds. Close-ups and mid shots: 8 to 10 seconds.
For the final compilation: 60 to 90 seconds total. At 3 to 5 seconds per clip, that is roughly 20 to 30 usable clips. Shoot 40 to 50 clips to give enough selection.
Exposing for the Subject
In bright conditions, some things will clip. White shirts in sun. White Bodrum walls. Bright sky at the edges of a shaded scene. If the subject, the thing I am actually filming, looks properly exposed, the clip is good. Do not chase highlights on things that are not the subject.
A few blown highlights on white fabric or walls is not overexposure. It is how the scene actually looks to the eye. The viewer expects bright white in Bodrum sun. Chasing those highlights would underexpose everything else.
Check zebras on the subject. If they are not flashing on the stalls, the products, the beach, or whatever the scene is about, take the shot.
Why Footage Looks Washed (And How to Eliminate It)
Sometimes footage looks flat, muted, or washed out despite the histogram looking fine. It is usually one or more of these things combined:
| Cause | What happens | How to check |
|---|---|---|
| Light direction | Shooting into the sun reduces contrast and colour | Where is my shadow? If behind me, I am facing the sun. Turn around. |
| Haze | Moisture in coastal air scatters light, especially toward the horizon | Look at distant hills or islands with my eyes. Sharp and clear means clean air. Faded and soft means haze. |
| Time of day | Midday overhead sun produces flat shadowless light | Is the sun high or low? High and harsh means shoot details or wait. |
| ND filter too high | Colour cast and milkiness at higher settings | Check sky colour in viewfinder. Blue means good. Milky means back the ring off. |
| Dirty lens | Smudges and salt residue cause soft haze | Look at the front element. Wipe with Zeiss wipe if needed. |
| Cinetone profile | Naturally understated. Slightly more muted than what the eye sees. | Normal. Fix with small vibrance and contrast bump in Premiere Pro. |
Before every clip, run through this checklist:
- Check shadow direction. Front lit?
- Look at the horizon with my eyes. Hazy?
- Check sky colour in viewfinder. ND filter clean?
- Check front element. Lens clean?
- Check time. Good light?
If all five are clear and the footage still looks muted, it is Cinetone being understated and it gets fixed in post.
Haze kills wide shots, not close-ups. On a hazy day, zoom in and shoot details. On a clear day, go wide.
Golden hour helps everything. Morning before 8:30 and evening after 5:30, the low warm light cuts through haze, adds contrast, and saturates colour naturally. The same scene that looks flat at midday looks vivid at 6pm.
Useful Turkish Phrases
| Turkish | English |
|---|---|
| Belgesel çekiyorum | I am shooting a documentary |
| Bodrum hakkında kısa bir film | A short film about Bodrum |
Scene 1: The Market
A covered market with open sides. Daylight coming in from the edges, shade overhead. Mixed lighting but softer and more directional than full sun. A good first scene.
Tripod Shot — Establishing Wide
I set up the tripod outside the market entrance, framing the length of the stalls from the exterior looking in. The exterior was bright Bodrum sun and the interior fell into shadow. The histogram showed a small spike near the shadows but nothing was clipping. That contrast is fine. It creates depth and draws the eye into the market. If I had exposed for the dark interior instead, the bright entrance and sides would have blown out completely.
| Setting | Value |
|---|---|
| Aperture | f/8 |
| ISO | 100 |
| White balance | 5200K |
| SteadyShot | Off (tripod) |
| ND filter | Off |
| Focal length | 18mm |
| Focus | Manual or Wide area (not Human tracking) |
White shirts clipping: People in white walking through the frame caused zebras to flash on their clothing. Normal in bright sun. The stalls, the ground, and the market structure were properly exposed. A few blown highlights on white fabric is not overexposure.
Held the shot static for 10 to 15 seconds. No panning, no movement. Let the market and the people moving through it do the work.
Handheld — Inside the Market
Took the camera off the tripod, turned SteadyShot back on, and went handheld for the interior.
| Setting | Value |
|---|---|
| SteadyShot | On |
| Aperture | f/4.0 |
| ISO | 200 (raised as needed inside) |
| ND filter | Off |
The interior is darker than outside. Opening up to f/4.0 and raising ISO to 200 compensated for the light drop. If the screen looked too dark at a stall, I raised ISO before recording, not during a clip.
Focal lengths — three separate clips:
- 18mm — Walking mid shot entering the market. Camera straight ahead, not looking left or right. The wide angle captures the stalls on both sides. 8 seconds.
- 85 to 135mm — Close-ups of produce, spices, colours. The compression makes products fill the frame and blurs the background slightly even at f/4.0. One clip per stall, 8 seconds each.
- 35 to 50mm — Mid shot of a stall with the atmosphere around it.
Take 2
I went back for a second pass. The first round of handheld shots was shaky because I was walking too fast and moving the camera too much. The second time I slowed down, planted my feet for the static shots, and let the scene do the work. The difference was clear on playback.
The realisation that changed everything: the market, the people, the colours, the movement, all of that is already happening without me doing anything. My only job is to hold the frame steady and let it play out.
Key Takeaways
| Lesson | Detail |
|---|---|
| Expose for the subject, not the highlights | White shirts in sun will clip. If the market looks right, take the shot. |
| f/8 outdoors in sun, f/4.0 in shade | Adjust aperture to conditions. Sweet spot is f/8 to f/11 in bright light. |
| ISO 100 is the floor | If that is not enough, ND filter is the next step down. |
| Do not zoom while recording | Each clip is one focal length. Stop, zoom, new clip. |
| Wide for movement, tight for still | 18mm walk-throughs work handheld. 135mm needs planted feet. |
| Walk slowly | Half speed. Bend knees. Heel to toe. Body is the shock absorber. |
| Let the scene create the action | Frame it and hold. Do not chase. |
Scene 2: Akyarlar Beach
4pm. Clear blue sky. Bright Bodrum sun. A beach with coastline, boats, and the sea. First outdoor scene and first time using the ND filter for video.
Settings
| Setting | Value |
|---|---|
| Aperture | f/8 |
| ISO | 100 to 125 |
| White balance | 5600K |
| ND filter | On (variable, dialled to taste) |
Shot 1: Wide Establishing — Tripod
18mm. Tripod. SteadyShot off. Framed the full bay with the sea in the upper two thirds and the beach in the lower third. Held for 12 to 15 seconds. Let boats, birds, and waves move through the frame.
Shot 2: Water Close-Up — Slow Motion
Switched to 50fps with 1/100 shutter. Zoomed to 70 to 100mm. Framed the waterline in the lower third, let the sea fill the rest. Held 10 seconds on the tripod.
Shot 3: The Dive — Tripod, 18mm, Slow Motion
Camera stayed on the tripod. I was the subject, walking into the sea and diving in. 18mm wide captured the full beach and waterline. Checked framing before walking in. Hit record, walked in, dove, let it run a few seconds after. 15 to 20 seconds total.
Shot 4: Details — Handheld
Switched back to 25fps and 1/50 shutter. 85 to 135mm. SteadyShot on. Walked along the beach looking for subjects. Boats, rope, shells, driftwood. Framed each subject in the lower third, planted feet, held 8 seconds per clip.
Shot 5: Low Angle
Camera near the sand at 18mm. Shot along the beach toward the water. Makes the beach feel vast.
What I Learned About Colour and Light
Some clips came back with beautiful colour. Others looked washed. The histogram was centred on all of them. Two things caused the inconsistency.
The ND filter introduced colour cast at higher settings. I was dialling it for correct exposure without checking what it was doing to the colour. The fix: colour first, exposure second. Check the sky in the viewfinder. If blue looks blue, shoot.
Light direction mattered more. The rich clips were front lit, sun behind me. The washed clips were shot facing the sun. Shooting into the sun causes glare, haze, and reduced contrast, and the ND filter makes it worse by adding another surface for light to scatter through.
Between the two, light direction explained the bigger difference. Some of what I thought was ND colour cast was actually just shooting into the sun.
The Stuck ND Filter
The filter got stuck on the lens. Known issue. Heat expands metal and two different metals bind together. In the field, dial to ND2 and keep shooting. At home, rubber grip or a 55mm filter wrench. Prevention: finger tight only.
Key Takeaways
| Lesson | Detail |
|---|---|
| Sun direction matters more than settings | Front lit shots have rich colour. Backlit shots wash out unless intentional. |
| Check your shadow | Shadow behind you means you are shooting into the sun. Turn around. |
| Colour first, exposure second with ND | Check sky colour in viewfinder before checking exposure. |
| 50fps for slow motion | Double shutter to 1/100. Check exposure after switching. |
| Finger tight on filters | Heat and over-tightening cause stuck filters. |
Scene 3: Bodrum Town — Morning Walk
The plan was to walk a route from the hilltop windmills down through the marina and along the coast to a cafe overlooking the castle. Shoot everything in golden hour, work the rest of the day. The route takes about an hour on foot so the idea was to hit every location while the light was good.
I got out earlier than planned. That turned out to be a good thing.
Blue Hour — Bodrum Değirmen (The Old Windmills)
I arrived at 7:15. Sunrise was listed at 7:30 but the sun had not cleared the mountain behind the town yet. It was blue hour. Dark, quiet, moody. Enough light to shoot but only by pushing ISO.
| Setting | Value |
|---|---|
| Aperture | f/8 |
| ISO | 400 to 800 |
| White balance | 5200K |
| ND filter | Off |
| Focal length | 18mm (wide establishing) then 50 to 85mm (tighter details of the town) |
The blue hour footage has a completely different feel to everything else I have shot. Dark tones, cool light, no shadows. Bodrum before the sun arrives. If I make this a standalone journey video, this is the opening. Dark and quiet, then the sun clears the mountain and everything changes.
Note for future
Sunrise time does not mean the sun is visible. Mountains, hills, and buildings can delay direct sunlight by 10 to 15 minutes. At this location the sun cleared the mountain at 7:45. Next time, plan for that.
Golden Hour — Gümbet Beach from Above
By 7:45 the sun came over the mountain. By 8:00 the side facing down toward Gümbet beach was fully golden. The light was beautiful. No ND filter needed. Low sun, warm colour, long shadows.
I took shots from the viewpoint looking down at the beach. Tripod, 18mm wide establishing shot of the coastline and bay. Then zoomed in to 50 to 85mm for tighter shots of the beach, boats, and water.
Gümbet Beach
Change of plans. The view from above was so good that I wanted to go down to the beach itself and get shots at ground level. The sun was behind me, front-lighting the beach and the boats. Peaceful morning, water still, boats sitting in the bay.
Set up the tripod and went for a swim. The shot from the hilltop above was pointed directly at where I swam, which will cut together nicely. Above and below.
This was the first time using the ND filter extensively. The beach was bright enough to need it. Results were good overall. Only a few clips were slightly overexposed. Getting more comfortable with the colour first, exposure second workflow.
The Marina — 9:00am
Showered and back out by 8:30. Descended into the marina by 9:00. Morning light still decent, sun higher now but not harsh yet.
Kahve Dünyası — exterior and rooftop.
Got a nice shot of the outside first. Then up to the rooftop. Set up the tripod for a shot of me drinking coffee with the marina and yachts behind.
This was tricky. I was sitting under an umbrella in shade, so I was well exposed. But the marina view behind me was a little overexposed and not fully vibrant because the sun was in that direction. Same problem as the market entrance: the camera cannot hold both a dark foreground and a bright background in one clip. I exposed for myself and the background washed out slightly.
For next time: Shoot two versions. One exposed for me, one exposed for the view. Pick the better one in the edit. Or find a seat where the sun is behind me and the view is front lit.
Close-up of the coffee. Handheld, 85 to 100mm. Coffee cup with the marina blurred behind. Planted feet, held steady.
Walking the Marina
From Kahve Dünyası I walked down the marina toward the sun. The shots facing the sun were washed, as expected. But when I turned around and filmed back the way I came, sun behind me, those shots looked good. Rich colour, front-lit marina, boats, buildings.
I did this naturally without thinking about it. Walked one direction, turned around, filmed the other way. The shadow check has become instinct. If the light is in my face, turn around.
The Simit Truck
Set up the tripod across the road at 85mm, level with the truck counter. Framed the truck on the right third of the frame with space on the left for me to walk in. Continuous AF, Human tracking. Hit record, walked up, bought a simit, walked away.
The personal feel is what I liked most. A real moment, not staged. The distance of the 85mm lens and being across the road made it feel candid. Nobody noticed the camera. The simit, the exchange, the walk away. That is the kind of clip that gives a compilation personality.
Close-ups after: the simits on the cart, the sesame seeds, the texture. 85 to 135mm, handheld, planted feet.
The Cadsi Market
Peaceful and quiet but surprisingly full of life. People, scooters, dogs, cats moving through. I found a spot, framed it, held still, and let the action enter and leave the frame on its own.
This is where the principle fully clicked. I am not filming action. I am framing a space and letting life happen inside it. A scooter passes through. A dog trots by. Someone walks across. Each one is a moment I did not plan, did not chase, and did not need to. The camera was ready and still. That patience is the technique.
Gaya Social Bodrum — The Castle Cafe
The final stop. Inside was dark. Two doors open to the sea where the sun was shining directly in. Same dynamic range problem as the market entrance and the coffee rooftop. Inside dark, outside bright, and the camera cannot hold both.
I exposed for the interior and let the doors blow out. Got a decent shot but it is a hard scene to make look good with one exposure.
The better approach would be: sit on the terrace instead of inside. If the view is the subject, be outside where the light is even and the camera is not fighting the contrast between a dark interior and a bright exterior.
Walking Home — Sun at My Back
Made my way back along the marina with the sun behind me the entire walk. Every shot was front lit. Rich colour, strong contrast, vibrant. This was the best stretch of footage from the whole morning because the light direction was consistently right.
The 85mm Moments
Something I discovered by accident. From a distance, zoomed to 85mm, I could film people in their natural moments. Drinking coffee. Smoking a cigarette on a bench. Reading a newspaper. Nobody noticed. The distance and the compression made each clip feel intimate without being intrusive.
It felt like being a quiet observer. Not performing, not staging, just watching life and holding the frame. That is the kind of footage I want more of.
Key Takeaways
| Lesson | Detail |
|---|---|
| Sunrise time is not sun-over-mountain time | Account for 10 to 15 minutes delay from terrain at any hilltop location. |
| Blue hour is a bonus, not a problem | Dark moody footage before sunrise has a different feel. Use it as an opening. |
| Turn around for better light | If the light is in my face, film the other direction. This became instinct. |
| Shade vs bright background is a choice | The camera cannot hold both. Expose for the subject and let the other go. Shoot two versions if time allows. |
| ND filter confidence growing | First extensive use. Mostly good results. Colour first, exposure second is working. |
| Patience is a technique | Frame a space, hold still, let life happen. Do not chase moments. |
| 85mm from distance captures real life | People in natural moments. Candid, intimate, unnoticed. More of this. |
| The gentle handheld drift | Body sway plus IBIS creates a smooth floating movement. IBIS cleans up the shake, the body creates the drift. It adds life between fully static tripod shots. Replicate by shifting weight slowly from one foot to the other over 8 seconds. |
| Spare battery is not optional | Video drains the battery far faster than photos. Barely survived one morning of shooting. Charging is slow. A spare NP-FZ100 needs to be in the bag. |
| Spare SD card in the bag | Forgot the card the day before. Always have a backup. |
Scene 4: Gümbet Beach — Sunset Swim
Back to the same beach from the morning. This time for sunset. I arrived at 6:10, one hour before the sun would set at 7:10. The plan was to shoot the beach in evening light, capture the quiet atmosphere, then set up the tripod and swim at sunset.
Coming back to the same location in different light is one of the best things I have done for this compilation. Morning was front-lit, bright, clean colour. Evening is warmer, softer, and heading toward golden. Same beach, completely different feel. That contrast will cut together well.
Settings
| Setting | Value |
|---|---|
| Aperture | f/8 to f/11 |
| ISO | 100 |
| Shutter | 1/50 (1/100 at 50fps for swim) |
| White balance | 5600K, switching to 5200K after 5:30 |
| Profile | Cinetone |
| ND filter | Off unless needed. Evening light is softer than midday. |
| Focus | Continuous AF, Wide area for scenery. Human tracking for swim. |
Gümbet Cafe — 6:10
Started at the cafe above the beach. A few establishing shots looking down at the water and the coastline. The light was still daytime at this point, not yet golden, but improving by the minute.
Walking Down to the Beach
Walked from the cafe down to the beach. Handheld, 18mm, SteadyShot on. Along the way I caught people by the beach. Standing, fishing, just being there. The beach was deserted but peaceful. Not empty, just quiet. The kind of atmosphere where you can hold the camera still and let the small moments happen.
This is becoming my favourite way to shoot. Find a spot, frame it, hold, and wait for life to pass through. A person fishing at the water’s edge. Someone standing looking out to sea. These are the clips that make a place feel real.
I shot some at 70mm handheld. People at the beach, a fishing rod, a beach club sign. Planted feet, 8 seconds each.
The Wide Establishing — Tripod
Set up the tripod facing the water. Sun was behind me, slightly to the right. Front-lit sea. f/11 at ISO 100 without ND filter gave clean exposure. Zebras were only on the sky and a white boat, not on the water. That is fine. The sea is the subject.
18mm wide. Held 15 seconds. Then zoomed to 70mm and 135mm for tighter shots of the water and a boat. Three clips from the same tripod position, three focal lengths.
Low Angle
Crouched down. 18mm near the sand. Shot along the beach toward the water. Makes the beach feel vast, especially with the evening light stretching across the sand.
The Swim — 7:00pm
Ten minutes before sunset. The sun was low and heading for the horizon, directly in front of the camera. This is the one time shooting into the sun is the right call. Low golden sun over the water, warm light everywhere, and me as a silhouette walking in and diving.
Switched to 50fps with 1/100 shutter for slow motion. 18mm wide on the tripod. SteadyShot off. Continuous AF, Human tracking so the camera would follow me walking into the water.
Framed it with the sun and water in the upper two thirds, the beach in the lower third. Did a test walk toward the water first. Played it back in shade. Focus tracked me and I stayed in frame the whole way. Then went for real.
Hit record. Walked in. Dove. Let it run. One take.
At 50fps in a 25fps timeline, that gives double the duration in slow motion. A slow walk into golden water at sunset. That should be one of the strongest clips in the compilation.
Blue Hour — After Sunset
The sun set. I stayed. The light shifted from warm golden to cool blue. The sky turned deep blue, the water went dark, and the whole scene took on a quiet, moody feel.
I stayed until around 8pm. The blue hour footage has a completely different atmosphere from everything else. It is calm and still. If the morning blue hour from the hilltop windmills opens the journey video, this evening blue hour could close it. Bookending the day with the same cool, quiet light.
Key Takeaways
| Lesson | Detail |
|---|---|
| Same location, different light | Morning and evening at the same beach gives two completely different looks. Worth revisiting locations. |
| Evening light needs less ND | Softer than midday. f/11 at ISO 100 was enough without the filter. |
| Shooting into the sun works at sunset | Low golden sun creates silhouettes and warm backlight. This is the intentional use of backlight. |
| Test the swim shot before committing | One take. Check framing and focus tracking on a test walk first. |
| Stay after sunset | Blue hour is short but beautiful. The mood shift from golden to blue tells the story of the day ending. |
| Deserted does not mean empty | Quiet moments of people fishing, standing, watching the sea. Hold the frame and let it happen. |
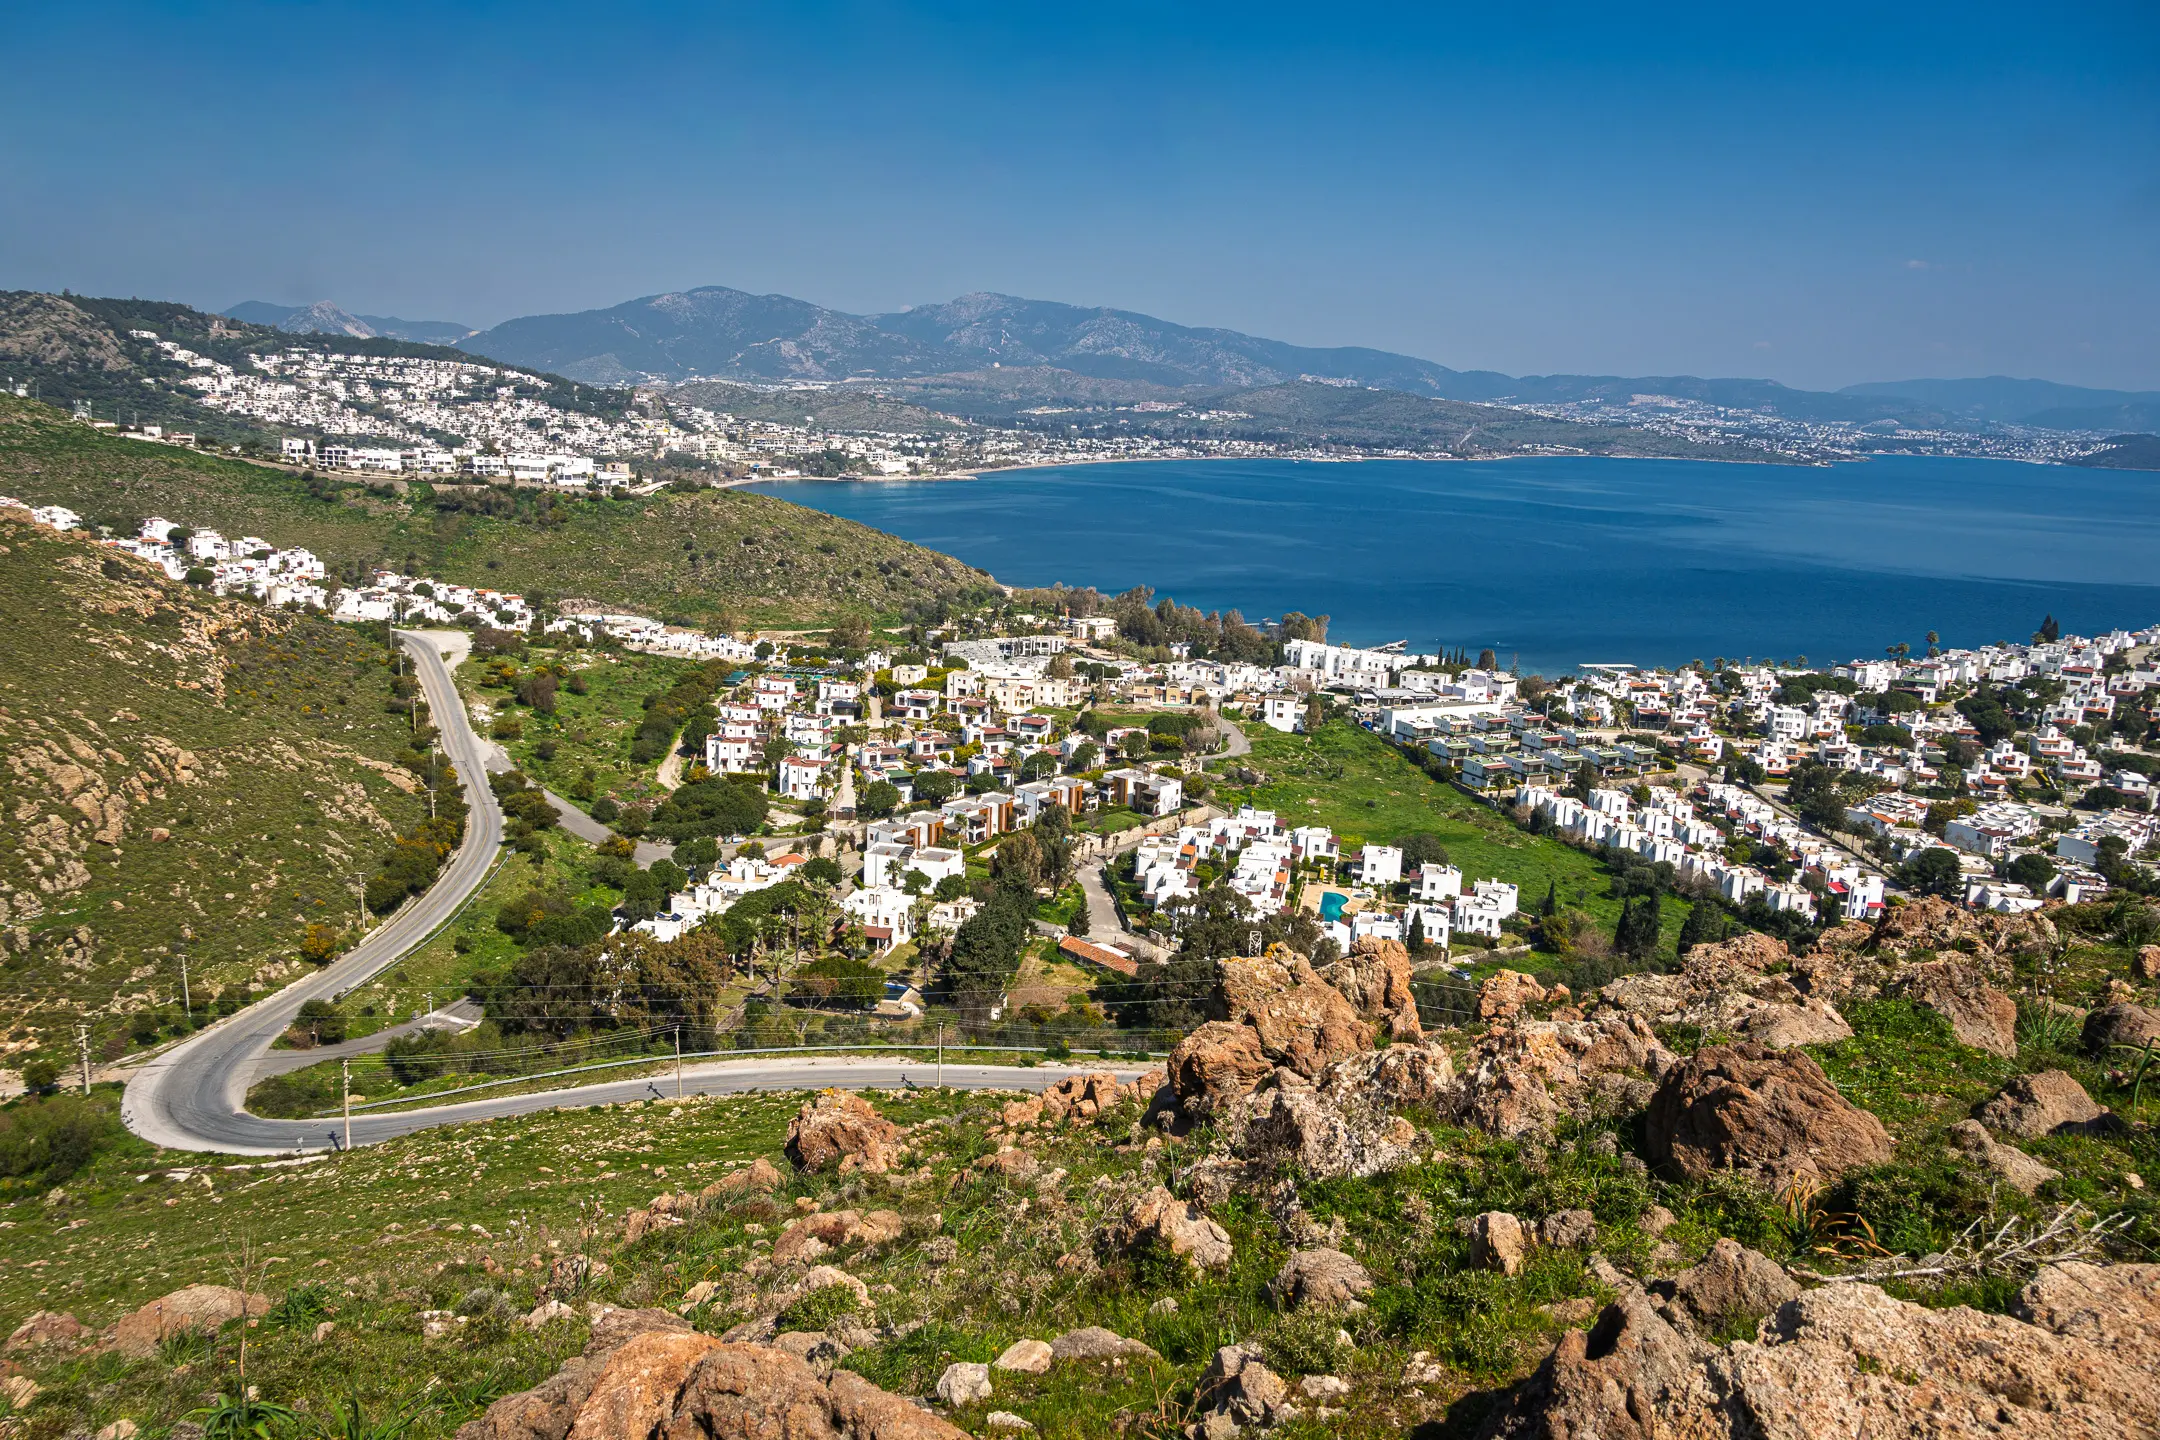
Scene 5: Antik Tiyatro — Sunrise Over Bodrum
The ancient theatre overlooks the whole of Bodrum. The castle sits to the left and the windmills to the right. From there I could see the marina, the town, and the coastline stretching out below.
What made this scene interesting was the geography. From the theatre I could see the windmills. From the windmills I could look down at Gümbet Beach. From the beach I could look back up at where I had been standing. Every location connects to the next. In the compilation, the edit can follow that path. Start at the theatre, cut to the windmills, cut to looking down at the beach, then cut to being on the beach. The viewer travels through a continuous space without a single word of explanation.
Location Threading
I did not plan this. I only noticed it after reviewing the footage. The locations I have been shooting are physically connected and visible from each other. That means the compilation does not have to be random clips from unrelated places. It can follow a route, a geography, a journey that the viewer feels even if they do not consciously notice it.
This is called location threading or visual sequencing. Shoot locations that geographically connect, then in the edit cut between them so each shot leads naturally to the next. It gives the compilation a sense of journey. I stumbled into it by just recording what I saw and noticing later that the pieces fit together.
The idea came from shooting, not from planning. I did not sit down with a map and plot a route. I went to places, pointed the camera at what looked good, and then when reviewing footage realised the scenes connect spatially. That is the benefit of shooting at locations you already know well. Bodrum is familiar to me. I know where things are in relation to each other. That familiarity showed up in the footage without me forcing it.
The Sun and the Mountain — Timing Golden Hour
Sunrise is listed at a specific time but the sun does not reach every location at that time. Mountains, hills, and buildings block direct sunlight. The delay depends on the angle and height of the terrain relative to where I am standing. Higher positions see the sun earlier. Lower positions wait longer.
The listed sunrise time is not what matters. The time the sun actually reaches the filming location is what matters. The same applies to sunset. Mountains can block the sun before the listed time. This table logs the real times at each spot so that on future visits I know exactly when to be set up and ready.
Sunrise delays:
| Location | Listed sunrise | Sun reaches location | Delay | Notes |
|---|---|---|---|---|
| Bodrum Değirmen (windmills) | 7:30 | 7:45 | 15 min | Higher elevation, sees the sun earlier |
| Antik Tiyatro | 7:30 | 7:55 | 25 min | Lower than windmills, longer wait |
| Turgutreis | 7:23 | 8:31 | 68 min | Mountain blocks sun for over an hour. Whole area lit at once when it clears. |
| Bodrum castle end | 7:22 | 8:15 | 53 min | Coast level, mountain blocks sun longer than hilltop positions. |
Sunset cutoffs:
| Location | Listed sunset | Sun disappears | Early by | Notes |
|---|---|---|---|---|
| Gümüşlük beach | 7:16 | 7:12 | 4 min | Sun dips behind mountains. Sky went red in the last 15 minutes. Epic. |
| Bodrum Değirmen (windmills), Gümbet side | 7:16 | 7:08 | 8 min | Sun drops behind Gümbet mountain. Red sky lasted 30 minutes after. Blue by 7:38. |
Turgutreis was a surprise. Over an hour delay between listed sunrise and the sun actually reaching the town. That is a long time to be set up waiting if you do not know. On a return visit, there is no point arriving at 7:23. Arrive at 8:15, set up, and be ready for 8:31.
The plan going forward: be set up 15 minutes before the logged sun arrival time. Shoot blue hour and pre-sun footage while waiting. Then the golden light arrives and there are roughly 30 minutes of the best light before the sun climbs too high.
When the sun finally clears the mountain there is a golden glow across all the white houses. That moment, the first light hitting the town, is the shot. Being set up and ready for it makes the difference.
This table grows with every new location. Each time I shoot a sunrise or sunset somewhere new, I log the actual time. Over time it becomes a personal reference for Bodrum that no app or website can give me.
The Shots
Wide establishing from the theatre looking across Bodrum. Tripod, 18mm. The castle to the left, windmills to the right, town and marina below. This is a strong opening shot for the compilation or the journey video because it shows the whole geography.
Tighter shots of the castle and the windmills from the same position. 50 to 85mm. Picking out the landmarks that the viewer will later see up close.
Shots around the windmills. Handheld, various focal lengths. The structure, the textures, the view looking down at Gümbet Beach below.
Focal Length Series
At the windmill I shot the same subject at 18mm, then 35mm, then 50mm, zooming in each time. I just knew to do it. It felt right to get the same thing at different sizes.
This is called a focal length series and it is useful in the edit. Each clip is the same subject at a different size in the frame. When cut together, it creates a natural zoom-in effect without ever zooming during a clip. Wide to mid to tight, three clean cuts that draw the viewer closer to the subject.
It also gives options. Maybe in the edit I only need the 18mm and the 50mm. Maybe the 35mm works better. Having all three means I can choose.
The rule when cutting: Do not cut from one focal length to one that is close to it. 18mm to 35mm is too small a jump and looks like a mistake, like the camera bumped. 18mm to 50mm or 18mm to 85mm works. The bigger the jump in focal length between cuts, the more intentional it feels. Small jumps look like errors. Big jumps look like decisions.
This is another technique I started doing instinctively before knowing what it was called. Shoot wide, mid, tight at subjects that deserve it. Skip the in-between focal lengths when cutting them together.
Key Takeaways
| Lesson | Detail |
|---|---|
| Locations connect geographically | The compilation can follow a route the viewer feels. Theatre to windmills to beach. |
| Location threading came from shooting, not planning | Review footage and notice how scenes connect spatially. Familiarity with the area helps. |
| Time the actual sun, not the listed sunrise | Mountains delay direct sunlight by 15 to 25 minutes depending on position. Note the delay for each location. |
| Be set up before the light arrives | Blue hour footage while waiting. Then ready when golden light hits. |
| The first light on white houses is the shot | That moment when the sun clears the mountain and Bodrum glows. Be ready. |
| Focal length series gives edit options | Same subject at 18mm, 50mm, 85mm. Cut between them for a natural zoom-in effect. Big jumps between focal lengths, not small ones. |
| Trust instinct then learn the name | Both location threading and focal length series came from doing, not from studying. The technique was right before I knew what it was called. |
Scene 6: Road Clips — Transition Footage
This was not a planned scene. I have been doing it automatically without realising. At various points around Bodrum, when I find a nice backdrop, I hold the camera still and let traffic pass through the frame. Cars, bikes, scooters driving through a static shot.
These clips are not about the road or the vehicles. They are about life moving through a frame while the location stays still. The same principle as the market and the beach, but with faster movement.
How I Shoot These
Handheld or tripod. Frame a street or road with a good background. Buildings, sea view, greenery, whatever looks good behind the road. Hold still. Let vehicles pass through. 8 to 10 seconds per clip. The motion blur at 1/50 shutter adds energy to the movement.
Continuous AF, Wide area. The road and the background are the subject, not the cars. Do not track individual vehicles.
Framing: I position the road in the lower right third of the frame so it cuts across diagonally. The road is not the centre of the shot. The backdrop fills the upper two thirds and the viewer sees the location first, the movement second. That is the right priority for a transition clip.
1/50 shutter is the sweet spot. Cars get a slight motion blur that makes them feel like they are moving through the frame with purpose. At 1/250 the cars would freeze and look static, which kills the energy. At 1/25 they would smear too much. Do not change it.
Techniques to Try
Vary the speed of traffic. A slow scooter drifting through the frame feels different to a fast car cutting across. Both work. In the edit, a slow scooter fits between two calm scenes. A fast car works before an energetic sequence.
Try different angles. The diagonal road cutting across the frame is strong. Also try head-on, where the road comes straight toward the camera and vehicles approach and pass. And from behind, where vehicles drive away from the camera into the distance. Three different feels from the same road.
Wait for the right vehicle. Do not just record and hope. Watch the traffic. When something looks good, a colourful car, a scooter with character, a truck, hit record just before it enters the frame and stop after it leaves. Curate the moment rather than capturing everything.
Golden hour road clips. Warm low light with long shadows from the vehicles stretching across the road. The motion blur plus the long shadows together add a lot of visual interest. Worth shooting at least one or two of these.
Sound. Road clips have natural sound. Engine, tyres, a horn in the distance. If I use ambient audio in the compilation, that sound can bridge between scenes in the edit even if the video cuts to something else.
Why These Work in a Compilation
In the edit, these clips work as transitions between location scenes. A static shot of a beautiful street with a car passing through takes the viewer from one place to the next. It adds pace and rhythm between the slower, quieter shots of beaches and cafes.
A compilation of only still landscapes and quiet moments can feel flat. A few road clips with movement break that up and give the edit energy. They are not feature clips. They are connective tissue.
I did not realise I was collecting these until I reviewed my footage and noticed I had several from different locations. They all have the same feel: a nice backdrop, a still frame, life moving through it. Same principle, different content.
Key Takeaways
| Lesson | Detail |
|---|---|
| Transition clips happen naturally | Film what catches the eye. Review later and notice the patterns. |
| Road in the lower third, not centre | The backdrop is the priority. The movement is secondary. |
| Static frame with moving subjects | Same principle as markets and beaches. Frame it, hold it, let movement happen. |
| 1/50 shutter is the sweet spot | Slight motion blur adds energy. Faster freezes the cars. Slower smears them. |
| Wait for the right vehicle | Curate the moment. Hit record when something good is coming, not before. |
| Try different angles | Diagonal, head-on, and from behind all feel different. Variety for the edit. |
| Golden hour road clips | Long shadows from vehicles plus warm light. Worth getting a few. |
| These are connective tissue in the edit | Between slow quiet scenes, a road clip with movement adds pace and rhythm. |
| Road audio can bridge scenes | Engine and tyre sound carries across cuts even when the image changes. |
Scene 7: Turgutreis — Morning
Woke up before sunrise and drove to Turgutreis. A different town, a different coastline, a different feel from Bodrum centre. The plan was to catch the morning light on a new location.
The Drive In
On the way in I caught a shot of cars driving with the Turgutreis sign above the road. Static frame, vehicles passing underneath the sign. Another transition clip for the library. The sign tells the viewer they have arrived somewhere new.
The Marina
Morning light on the Turgutreis marina. Boats, coastline, people fishing. The same shot types as Bodrum marina but a different location. Wide establishing at 18mm, mid shots at 35 to 50mm of boats and the coastline, and close-ups at 85 to 135mm of details.
People fishing at the water’s edge. Held the frame and let them work. Same approach as the Bodrum market and the Gümbet beach. Frame it, hold it, let life happen.
The Cat on the Tree
A cat sitting in a tree. The tree was dark and the background behind it was bright. I exposed for the cat, not the background. The background blew out but the cat was properly lit and sharp. Same principle as the market and the white walls. Expose for the subject, let the rest go.
Shot at 135mm with Animal tracking on. The A6700 locked onto the cat’s eyes and held focus. At 135mm the background fell away and the cat was isolated in the frame. Close-up animal shots with eye tracking at long focal lengths feel intimate. The camera does the hard work. I just need to frame it and hold still.
The Narrow Streets
Went handheld into the narrower streets of Turgutreis. Sun was behind me so the street was front lit. Did not need the ND filter. Went up to f/16 instead for cleaner colour.
Found a spot between two roads, crouched low, and waited. A few bikes had already passed and I knew another would come. I committed to the shot. Squatted there for five minutes, camera framed and ready. When the bike finally came, it cut across the frame perfectly. That clip was earned through patience and dedication, not luck.
The ND Filter Fiddling Problem
I shoot photos and video on the same camera. Photos need the ND filter off. Video sometimes needs it on. That means constantly screwing and unscrewing the filter, which is slow and fiddly. Some moments happen quickly and I cannot react because I am mid-switch.
This is another practical reason to avoid the ND when possible and use f/16 instead. No filter to remove, no time wasted, always ready to shoot. The best clip is the one I actually capture. A technically perfect setup means nothing if the moment is gone by the time the filter is on.
The lens hood has the same problem. It does not fit over the ND filter, so when the ND goes on the hood comes off, and when the ND comes off the hood should go back on. In practice I was not using the hood at all because the switching was too much. Going forward, the goal is to keep the hood on by default and avoid the ND unless absolutely necessary.
Key Takeaways
| Lesson | Detail |
|---|---|
| Expose for the subject in mixed light | Cat on dark tree with bright background. Expose for the cat, let the background go. |
| Animal tracking at 135mm | The A6700 locks onto eyes. Strong intimate clips with background separation. |
| Five minutes for one shot | Patience is a technique. See the pattern, commit, wait. The clip is earned. |
| ND filter switching kills spontaneity | Constantly screwing on and off between photo and video wastes time and loses moments. |
| f/16 over ND when possible | No filter fiddling, no colour shift, no hood removal. Always ready. |
| Location signs make good transition clips | The Turgutreis road sign tells the viewer they have arrived somewhere new. |
Scene 8: Gümüşlük Beach — Sunset Between the Mountains
Arrived at 6:20. Sunset listed at 7:16. A smaller, more intimate beach than Gümbet with mountains framing the sunset on both sides. This turned out to be the best sunset I have filmed.
Settings
| Setting | Value |
|---|---|
| Aperture | f/8 to f/16 |
| ISO | 100 |
| Shutter | 1/50 (1/100 at 50fps for swim) |
| White balance | 5200K |
| Profile | Cinetone |
| ND filter | Off the entire session. f/16 when needed. |
| Focus | Continuous AF, Wide area for scenery. Human tracking for swim. |
No ND filter for the whole shoot. Used f/16 instead when the light was too bright at f/11. Cleaner colour, no fiddling, always ready. This is becoming the standard approach.
The First Hour — 6:20 to 7:00
A mix of everything. Coast, details, people, the swim. The light was warm and getting warmer.
Handheld along the coastline. Wide shots at 18mm of the beach and the mountains. Mid shots at 35 to 50mm of the shore and the boats. Close-ups at 85 to 135mm of details and people.
Set up the tripod for the swim. 18mm wide, 50fps slow motion at 1/100. Also did handheld shots from the shore. Swam facing the sun with the mountains behind the water. The silhouette against the golden water and the mountains framing the scene.
The Last 15 Minutes — 7:00 to 7:12
This is where it happened. The sun dropped toward the gap between the two mountains and the whole sky went red. Not golden, not warm. Red. The mountains framed the sun perfectly, like it was setting into a valley made for it.
The sun disappeared behind the mountains at 7:12, four minutes before the listed sunset time of 7:16. It dropped fast. In those last 15 minutes the light changed more rapidly than at any other point. The colour shifted from golden to deep orange to red within minutes.
I got the swim in just before it dipped. Facing the sun, silhouetted against the red sky and the mountains. One take.
Note for next time
The last 15 minutes is everything at this location. The sun drops rapidly behind the mountains and the sky goes red. Be set up and ready by 6:55. Do not be fiddling with settings or walking to a spot at 7:00. Be there, framed, recording.
Gümüşlük vs Gümbet
| Gümbet | Gümüşlük | |
|---|---|---|
| Size | Larger, open coastline | Smaller, more intimate |
| Sunset | Sun sets over open water | Sun sets between mountains |
| Feel | Wide and expansive | Enclosed and dramatic |
| Best for | Wide establishing shots, open water | Sunset drama, framed compositions |
Both are worth shooting but for different reasons. Gümbet gives the wide Bodrum beach footage. Gümüşlük gives the dramatic sunset moment. In the compilation they serve different purposes.
Key Takeaways
| Lesson | Detail |
|---|---|
| Mountains frame the sunset | Gümüşlük’s mountains create a natural frame. The sun drops between them and the sky goes red. |
| Last 15 minutes is the shot | The light changes fastest in the final moments. Be set up and ready, not walking or adjusting. |
| Sun disappears early behind mountains | Listed sunset 7:16, actual disappearance 7:12. Log it. |
| No ND filter for the whole session | f/16 handled the bright moments. Clean colour, no fiddling. |
| Smaller beaches can be more dramatic | Gümüşlük is more intimate than Gümbet and the enclosed mountains add composition that an open coastline does not have. |
| Two swim shots in the compilation | Gümbet at sunset and Gümüşlük at sunset. Same idea, different locations, different light, different feel. |
Scene 9: Bodrum Castle Walk — The Reverse Route
Same locations as Scene 3, opposite direction. Scene 3 started at the windmills and walked down through the marina toward the castle cafe. This time I drove to the castle end and walked the other way. Same streets, same coastline, same marina, but seen from the other side in different morning light.
This creates a mirror route in the compilation. The viewer recognises the locations but the perspective is new. It adds depth without needing new places. Two journeys through the same town, two different experiences.
Settings
| Setting | Value |
|---|---|
| Aperture | f/8 to f/16 |
| ISO | 100 to 400 |
| Shutter | 1/50 |
| White balance | 5200K |
| Profile | Cinetone |
| ND filter | Off the entire session |
| Focus | Continuous AF, Wide area. Animal tracking for cats and dogs. |
No ND filter. Avoided it completely. f/16 when the light was too bright. Hood on.
Blue Hour — Before 8:15
Listed sunrise was 7:22 but the sun did not clear the mountain on this side of town until 8:15. That is a new data point. The castle end of Bodrum gets direct sunlight later than the windmill side.
Before the sun arrived, the light was cool blue with dark tones. Moody, quiet, still. The same blue hour quality as the windmill morning in Scene 5. These pre-sun clips have a feel that golden hour cannot replicate.
Golden Hour — 8:15 Onward
The sun cleared the mountain at 8:15 and lit up everything in front of me. Because I was walking away from the sun, the light was behind me the entire walk. Every scene in front of me was front lit. Rich colour, warm light, long shadows. This is the ideal shooting direction and I did not have to think about it. Walking away from the sunrise naturally puts the sun at my back.
The Coast Toward the Castle
Walking down the coast toward the castle. Handheld at 18mm for walking shots. Tripod for establishing wides of the coastline with the castle ahead.
Cats and dogs along the way. Close-ups at 135mm with Animal tracking. The A6700 locked onto their eyes and held focus. One shot had a cat framed with the castle in the background at around 50mm. The cat is the subject, the castle gives context. Two focal lengths, two different stories from the same moment.
The Çarşı Streets
The narrow market streets were well lit this time. Not the harsh overhead sun from previous visits. The morning light was coming in at an angle, side-lighting the buildings and creating shadows that gave the streets depth and texture.
Found a side street and posted up. Framed the street with the sea visible behind it. Held still and recorded as people entered and exited the frame. The same patience technique from the market, the beach, and Turgutreis. Frame a space, hold, let life happen. A person walks through. A scooter passes. Someone stops to look at something. Each one is a moment I did not create but was ready for.
The Mirror Route
| Scene 3: Windmills to Castle | Scene 9: Castle to Windmills | |
|---|---|---|
| Direction | Downhill toward the marina | Along the coast toward the marina |
| Sun position | Behind me, front-lit | Behind me, front-lit |
| Sun arrival | 7:45 at windmills | 8:15 at castle end |
| Blue hour | From the hilltop, overlooking town | From the coast, along the waterfront |
| Feel | Descending into the town | Moving through the town |
| Key moments | Simit truck, coffee rooftop, market | Cats with castle backdrop, side street with sea |
Same town, two directions, two mornings, two sets of clips. In the compilation these can intercut. A wide from the hilltop, then a close-up from the coast. The viewer feels the geography without it being explained.
Key Takeaways
| Lesson | Detail |
|---|---|
| Reverse the route for new perspectives | Same locations look different from the other direction. Free variety. |
| Castle end gets sun at 8:15 | 53 minutes after listed sunrise. Later than the windmill side. Log it. |
| Walking away from the sun is the default | Front-lit scenes the entire walk without thinking about it. |
| Animals with landmarks in background | Cat at 50mm with castle behind. Subject plus context in one frame. |
| Side streets with sea behind | Frame the street, hold, let people move through. The sea in the background adds depth. |
| No ND filter, no problems | f/16 handled the bright moments. Clean colour all morning. |
Scene 10: Bodrum Değirmen — Sunset from the Windmills
Back at the windmills, this time for sunset. Arrived 20 minutes before the listed sunset time. Quick session with a specific plan. No wandering, no overwhelm.
What Worked and What Did Not
The castle side was underwhelming. The golden glow on the town was nothing special from this angle at this time. Not every shot is a keeper and not every direction is worth the time. Lesson learned.
The Gümbet side facing the sun was the main event. The sun dropped behind the Gümbet mountain at 7:08, eight minutes before the listed sunset of 7:16. After it disappeared the sky went red and stayed red for 30 minutes. By 7:38 it had turned fully blue.
That 30-minute red sky window is long. Much longer than the last 15 minutes at Gümüşlük. At this location the post-sunset colour is the real show, not the sun itself. On a return visit, the plan would be: arrive at 7:00, get set up facing Gümbet, shoot the sun dropping, then stay for the red sky.
What I Would Do Differently
Skip the castle side entirely. Spend all the time on the Gümbet side. The sunset and the afterglow are the reason to be at this spot. The castle can be filmed in morning light from the reverse route where it looks better.
Not every location works in every direction at every time. The windmills at sunrise facing the castle is strong. The windmills at sunset facing Gümbet is strong. The windmills at sunset facing the castle is forgettable. Knowing which direction works at which time is the kind of knowledge that only comes from being there and trying both.
Key Takeaways
| Lesson | Detail |
|---|---|
| Not every direction is worth shooting | Castle side at sunset was flat. Gümbet side was the shot. Know which direction works at which time. |
| Post-sunset red sky lasted 30 minutes | The afterglow is the real show at this location. Stay for it. |
| Sun disappears 8 minutes early | Mountain cuts the sun off before listed sunset. Be ready earlier. |
| Have a plan and a shot limit | 20 minutes, 6 shots, no overwhelm. Execute and leave. |
| Return visits refine the knowledge | First visit is discovery. Second visit is knowing what works. |
Scene 11: Gümbet Beach — Filming Murat
First time filming a specific person as the subject, not part of a scene. Arrived at Gümbet beach around 3pm with Murat. Shot portraits first, then video. This session changed how I think about aperture and compression.
Settings
| Setting | Value |
|---|---|
| Aperture | f/5.6 |
| ISO | 100 |
| Shutter | 1/50 |
| White balance | 5600K |
| Profile | Cinetone |
| ND filter | On for some clips (needed at f/5.6 in afternoon sun) |
| Focus | Continuous AF, Eye AF, Human tracking |
| Setup | All handheld |
This is the first time I shot video at f/5.6 on purpose. Every other scene has been f/8 to f/16 because the location was the subject. Here, Murat was the subject and the beach was just the backdrop. Opening up to f/5.6 gave background separation I have not had in any other footage. His face sharp, the sea and sand soft behind him. The difference was immediately visible on the screen.
The ND filter was necessary for some clips. At f/5.6 in 3pm sun with 1/50 shutter and ISO 100, the image was overexposed. Could not close the aperture because the shallow depth of field was the point. Could not raise the shutter because of the 180-degree rule. The ND was the only option. Applied the Premiere Pro correction preset to those clips later.
The Shots
Close-up portraits at 85 to 135mm. This is where the session came alive. Zoomed in tight, sometimes to full 135mm for headshots. Murat’s face filled the frame. At f/5.6 and 135mm the background was completely soft. The compression at those focal lengths made the shots feel cinematic and intimate.
Lighting a cigarette. Had him light a cigarette and smoke. The smoke, the hands, the lighter, the exhale. 85 to 135mm handheld. Planted feet, held steady. Real moment, not posed. 8 to 10 seconds per clip.
Singing. At one point he started singing. Kept recording. Those unplanned moments are the best footage. Natural, unguarded, real.
Walking along the shoreline. Wider at 55mm. He walked slowly along the water’s edge. I stood still and let him move through the frame. 10 seconds.
Scooter. Got shots of him on a scooter passing by the camera. Also a burnout. Shot some at 50fps for slow motion and some at 25fps. The mix gives options in the edit. The slow motion burnout with sand or dust kicking up will look good.
What I Learned About Portrait Video
f/5.6 with compression changes everything. At 85 to 135mm and f/5.6, the person is isolated from the background in a way that f/8 to f/11 cannot do on this lens. The footage looks different from every other scene in the compilation. When Murat appears in the edit, the viewer immediately feels that this clip is about him, not the location.
Getting close with the zoom, not the feet. At 135mm I was standing several metres back but the frame was tight on his face. That distance meant he was relaxed because I was not in his space. The compression made the shot feel close and personal even though I was far away. Same CIA technique from Scene 3, but with a person who knew I was filming.
The ND filter is justified here. For scene shooting at f/8 to f/16, the ND is avoidable. For portrait video at f/5.6, it is necessary in bright conditions. This is the one situation where the trade-off is worth it. The shallow depth of field matters more than the slight colour shift, and the shift gets corrected in post anyway.
The Audio Problem
The wind was strong. Because I was far away at 85 to 135mm, the on-camera microphone picked up wind and ambient noise, not Murat’s voice. His singing was barely audible on playback. The camera mic is next to me, not next to him.
For future portrait sessions where audio matters, I need an external microphone closer to the subject. A wireless lapel mic or a shotgun mic on a boom would solve this. For now, these clips work with music over the top or as silent visuals. But if I want to use someone’s voice or natural sound in the edit, the on-camera mic is not enough at distance.
Key Takeaways
| Lesson | Detail |
|---|---|
| f/5.6 for people, f/8+ for places | First time using open aperture for video on purpose. The separation is immediately visible. |
| 85 to 135mm compression makes portraits cinematic | Tight framing from a distance. The subject is relaxed, the background is soft, the shot feels intimate. |
| ND filter is justified for portrait video | Cannot close aperture when shallow depth of field is the point. Correct the colour shift in post. |
| Unplanned moments are the best footage | The singing was not asked for. Keep recording when real moments happen. |
| Distance keeps the subject natural | Standing far back with a long lens. They forget the camera is there. |
| On-camera mic fails at distance in wind | Need an external mic for portrait sessions where audio matters. |
| Mix 25fps and 50fps for variety | Scooter clips in both give options in the edit. Normal speed and slow motion of the same moment. |
Scene 12: Kapıkırı Village — Lake Bafa
The furthest location from Bodrum. A 1.5-hour drive to a village on the shores of Lake Bafa with mountains, ancient ruins, and a completely different feel from the coast. Arrived late morning and stayed through sunset and beyond. Rationed the battery carefully throughout the day.
This scene has more variety than any other. Roadside food stalls, a village with chickens and cows, a mosque call to prayer, an old woman selling bracelets, a lake swim, and a pink sky afterglow. The kind of place where life happens around you without any effort.
The Drive — Roadside Stops
On the way to the village I pulled over twice.
Food truck with dog. A food truck by the road with a dog lying on the floor outside and Lake Bafa visible in the background. One shot. The dog, the truck, the lake. Three layers in one frame.
Fresh strawberry stall. Further down the road, a stall selling fresh strawberries with the road and lake behind it. Got the wide establishing shot of the stall, then a close-up of the strawberries themselves. Colour and texture.
These roadside stops are the kind of clips that give a journey video its character. They are not planned locations. They are things noticed while driving and worth pulling over for. The compilation feels more like a real trip when it includes the moments between destinations, not just the destinations themselves.
Settings
| Setting | Value |
|---|---|
| Aperture | f/8 to f/16 |
| ISO | 100 |
| Shutter | 1/50 (1/100 at 50fps) |
| White balance | 5200K |
| Profile | Cinetone |
| ND filter | Mostly off. Used occasionally. |
| Focus | Continuous AF, Wide area. Animal tracking for animals. |
Most clips at f/16 without the ND filter. Clean colour. Battery conservation was a priority so the camera was off between shots.
The Village — Afternoon
Arrived into Kapıkırı around 1pm. The village sits at the base of the mountains with the lake below.
High vantage point. 18mm wide from above, watching people descend a path into the village. Then zoomed in on them. Wide for context, tight for the people. The focal length series approach.
Laundry line. Clothes swinging on a line with the mountains in the background. Shot at 50fps for slow motion. The wind doing the work. Camera still, subject moving. The same principle as every other scene but with a different kind of movement. This is the first slow motion detail shot beyond swimming.
Chicken. A chicken running into the scene with the mountains behind. 25fps. Held the frame, the chicken entered and crossed. Unplanned, unforced. Then an uncle walked in eating fruit. Life happening inside a steady frame.
The mosque and the call to prayer. Climbed some rocks and found a view with the mosque to the left and ancient castle ruins to the right. While recording, the mosque started the call to prayer. The audio from that clip might be the one moment in the whole compilation where ambient sound is more powerful than music. 26 seconds of the call to prayer echoing across the village with the mountains behind.
Shot the same composition with me in the middle of the frame. Tripod, let it run for a minute. The village, the mosque, the ruins, and me in it.
The People
Kid herding cows. A boy herding cows up a hill in the village, hitting them with a stick from behind to keep them moving. Wide shot first to show the scene, then zoomed in on him. Two clips. Context then subject. The focal length series is becoming automatic.
Old woman selling bracelets. Started wide to show the stall and the setting. Then zoomed in closer. Then closer again. Then set up the tripod, hit record, and walked into the scene myself to buy something from her. The interaction played out on camera. Nearly 4 minutes of continuous recording because I was talking to them. In the edit that becomes 5 to 10 seconds of the best moment from the conversation.
It was very windy during this clip and the tripod was shaking slightly. IBIS was off because it was on the tripod. In windy conditions like this, leaving IBIS on would have helped dampen the vibration. Note for next time.
Dog at the beach. Close-up of a dog by the lake. Animal tracking. 25fps.
The Swim — Sunset
Set up the tripod by the lake. 18mm wide. 25fps at normal speed, not slow motion. This swim was not about the dive or the slow motion drama. It was about being in the lake at sunset. Kept the file size small. The camera ran for about 7 minutes capturing the whole thing.
The Afterglow — 20 Minutes After Sunset
The sunset itself was average. But 20 minutes after the sun dropped, the sky went pink. Boats on the water with the castle in the background and pink skies above. This was the shot of the day.
The afterglow is often more dramatic than the sunset itself. The sun drops, the sky goes flat for a moment, then the clouds and atmosphere light up pink and red. Most people pack up when the sun disappears and miss the best part.
Got a variety of shots during this window. Different focal lengths, different compositions. The pink sky lasted about 15 to 20 minutes before fading into blue hour.
Battery Management
One battery for a full day at a remote location. The strategy that worked:
- Camera completely off between shots. Not standby. Off.
- Minimal reviewing of footage on screen. Check one or two clips, not all of them.
- Save the battery for the moments that matter. Roadside stops and village exploration in the afternoon. Sunset and afterglow in the evening.
- The battery survived. Barely. A spare is not optional for trips like this.
Key Takeaways
| Lesson | Detail |
|---|---|
| Roadside stops are part of the journey | Pull over when something catches the eye. The moments between destinations give a trip video its character. |
| Slow motion works on details, not just swimming | Laundry on a line at 50fps with mountains behind. Wind is free movement. |
| The call to prayer is an audio moment | Ambient sound can be more powerful than music. Check this clip’s audio. |
| Focal length series is becoming automatic | Wide then zoom in. Context then subject. Doing it without thinking. |
| Walk into the scene for participation clips | Set up tripod, hit record, walk in and interact. The simit truck approach applied to new situations. |
| The afterglow beats the sunset | Stay 20 minutes after the sun drops. The pink sky was the best shot of the day. |
| IBIS on in windy tripod conditions | Wind shakes the tripod. IBIS can help dampen that. Exception to the normal rule. |
| One battery, camera off between shots | Survived a full day at a remote location by being disciplined about power. |
Scene 13: Bodrum Castle — Inside Looking Out
The castle has been in the background of half the compilation. From the windmills, the marina, Antik Tiyatro, Gaya Social cafe, the reverse route walk. Always in the distance, always framing Bodrum from the outside. This scene goes inside.
Arrived at 8:30 when it opened. Overcast sky. Soft, even light. No harsh shadows on the stone walls, no blown highlights, no ND filter needed. Ideal conditions for architecture and detail work.
Settings
| Location | Aperture | ISO | White balance |
|---|---|---|---|
| Outside walls and towers | f/8 | 200 to 400 | 5600K |
| Covered corridors | f/5.6 | 400 to 800 | 5600K |
| Inside museum rooms | f/4.0 to f/5.6 | 800 to 1000 | 3200K under warm lights, 5600K near windows |
| Arched doorways and windows | f/5.6 to f/8 | 200 to 400 | 5600K |
All handheld. Left the tripod at home. The castle is stairs, narrow corridors, ramps, and uneven stone floors. A tripod would have slowed everything down. IBIS on, lens hood on, no ND filter.
The Views — Outside Walls and Towers
The first thing I did was climb to the highest point and look out. 18mm wide over the marina, the town, the sea. This is the shot that closes the loop. The viewer has seen the castle from everywhere across the compilation. Now they see Bodrum from the castle.
From the same position, zoomed to 50 to 85mm and picked out landmarks. The windmills. The marina where I bought the simit. The Çarşı market streets I walked through. Locations the viewer recognises from earlier scenes, now seen from above and inside the castle walls.
Walked along the walls at 18mm. Slow handheld. The stone walls framing the sea views on either side. Low angle looking up at a tower against the overcast sky. The castle felt massive from below.
Close-ups at 85 to 135mm. Stone texture, coats of arms carved into the walls, a cannon. The kind of detail work that benefits from overcast light because there are no harsh shadows hiding the texture.
The Corridors and Architecture
Arched doorways are natural frames. I stood at one end and framed the length of a corridor at 18mm. Light at the far end, shadow in the middle. Held 10 seconds and let people walk through.
Close-ups of carved stone, old wood, iron door fittings at 85 to 135mm. The textures that make the castle feel its age.
One shot I tried both ways: a window looking out to the sea. First I exposed for the interior so the stone walls were visible but the window was blown out and glowing. Then I exposed for the window so the sea and sky were properly exposed but the interior became a dark frame. Two clips, same position, two completely different feelings. The window-exposed version looked more cinematic. Dark stone framing a bright view of the Aegean. That is a clip that feels like a film.
The Museum
Inside the museum rooms the light dropped. f/4.0 to f/5.6, ISO 800 to 1000. White balance shifted to 3200K under the warm artificial lights.
Close-ups of amphoras, ancient glass, and objects behind display cases at 85 to 135mm. The shallow depth of field at f/5.6 isolated individual artefacts from the background of the display. Same principle as portraits: the artefact is the subject, the rest is context.
One wide at 18mm of a museum room showing the space, the displays, the architecture of the room itself.
Closing the Loop
The last shot before leaving was the same wide from the highest point. 18mm over the marina. The viewer starts the scene arriving at the castle and ends it looking out over the same Bodrum they have been exploring for the entire compilation. The castle is not just a location. It is the vantage point that ties every other location together.
Key Takeaways
| Lesson | Detail |
|---|---|
| Overcast is ideal for architecture | Soft even light, no harsh shadows, textures and details look great. |
| Leave the tripod for tight indoor spaces | Stairs, corridors, ramps. Handheld with IBIS is more practical. |
| Shoot windows both ways | Expose for inside: warm and atmospheric. Expose for outside: dark frame, cinematic view. Get both. |
| Change white balance between daylight and artificial light | 5600K outside, 3200K under warm museum lights. |
| The castle closes the geographic loop | Every location filmed from outside is now seen from inside the castle looking out. |
| f/5.6 works for artefact close-ups | Same subject isolation principle as portraits. The artefact is the subject. |
| Landmarks from earlier scenes visible from the walls | The windmills, the marina, the market. The viewer recognises them from a new perspective. |
Scene 14: Turgutreis — First Time-Lapse
Third visit to Turgutreis. First attempt at a time-lapse. The weather finally cooperated with broken clouds and a clear evening. Set up at Şevket Sabancı Park overlooking the sea.
The Time-Lapse
Started at 7pm. f/11 at ISO 100, 1/50 shutter, 5200K, Cinetone. Manual focus locked on the scene. 3-second intervals. Let it run for 37.5 minutes to get roughly 30 seconds of footage at 25fps.
Exposure: Started at +0.7 EV. Slightly overexposed. Locked everything and let it darken naturally. By the end it was at -2 EV, pretty much dark. The transition from bright to dark is the whole point of a sunset time-lapse. The viewer sees the light change in 30 seconds what took 37 minutes in real life.
Composition: 18mm wide. Lighthouse in the upper right third. Sunset in the upper left third. A walking path in the foreground with the sea and waves crashing in the lower third. Horizon sat around the middle.
The result: Happy with it for a first attempt. The light transition worked. The clouds moved through the frame. The sky changed colour. It felt like a real time-lapse.
What I Would Change Next Time
Zoom in more. 18mm was too wide. The sunset and the sky colour were a small part of a big frame. At 35mm or even 50mm the redness and the colour changes would fill more of the frame and have more impact. The wide shot shows the whole scene but the drama of the sunset gets lost in the scale.
Different location within Turgutreis. The park was fine but the foreground was just a path. Next time, set up closer to the marina, more toward the lighthouse side where people enter the sea at the small public beach. People in the water, boats at the marina, the lighthouse. That gives the foreground life and human activity instead of an empty path. A time-lapse with people moving through the foreground at speed is more engaging than static ground.
The sunset itself was disappointing. The sun did not move to the centre of the frame. It went slightly down and to the left. Not the dramatic centred sunset I expected. This is a framing lesson. Before starting the time-lapse, I need to check where the sun will actually set on the horizon relative to my frame. Apps like Sun Surveyor or PhotoPills can show the exact path. Or I note it from this attempt: at this park in March, the sun sets left of centre.
Settings Reference for Future Time-Lapses
| Setting | Value | Notes |
|---|---|---|
| Mode | S&Q, Time-lapse | Creates video file in camera |
| Focal length | 35 to 50mm next time | 18mm was too wide for sunset drama |
| Aperture | f/11 | Sharp, controls bright starting exposure |
| ISO | 100 | Lowest, cleanest |
| Shutter | 1/50 | Consistent |
| White balance | 5200K | Golden hour warmth |
| Interval | 3 seconds | Standard |
| Frame rate | 25fps | Matches compilation |
| Focus | Manual, locked | AF trick: focus in AF, switch to MF |
| SteadyShot | Off | Tripod |
| ND filter | Off | Light drops naturally, ND would make end too dark |
| Profile | Cinetone | Consistent |
Exposure approach: Lock manual. Accept it gets darker. Start correctly exposed or slightly over. Do not adjust mid-lapse. The natural darkening is the transition.
Duration guide: 30 minutes at 3-second intervals gives roughly 600 frames, which is about 24 seconds at 25fps. 37.5 minutes gave about 30 seconds. For a 60 to 90 second compilation, 10 to 15 seconds of time-lapse is probably enough.
Notes for Next Turgutreis Visit
| Observation | Detail |
|---|---|
| Sun sets left of centre from Şevket Sabancı Park | Frame accordingly or reposition to put the sun where I want it. |
| 18mm too wide for sunset time-lapse | 35 to 50mm next time for more sky drama. |
| Foreground needs life | Set up near the public beach by the lighthouse. People, boats, water activity. |
| The marina side is more cinematic | More visual interest than the park path. |
| Third visit, still learning this location | Each visit reveals what works and what doesn’t. Return visits are not wasted. |
Key Takeaways
| Lesson | Detail |
|---|---|
| First time-lapse worked | The technique is simple. Lock settings, press start, walk away. The camera does the rest. |
| 18mm is too wide for sunset drama | The colour change is a small part of a big frame. Zoom in next time. |
| Foreground matters in time-lapses | An empty path is less engaging than people and boats. Choose the location for what’s in the bottom of the frame, not just the sky. |
| Check where the sun will actually set | It doesn’t go straight down. It moves laterally. Know the path before framing. |
| Overexposed start, dark finish is natural | The transition is the point. Don’t fight it. |
| Set it and commit | 37 minutes without touching the camera. The time-lapse ran and I watched the sunset with my eyes. Worth it. |
What Comes Next
Fourteen scenes across Bodrum, Turgutreis, Kapıkırı village, and Gümüşlük. A market, three beaches, a castle, a national park, a portrait session, a reverse route, a time-lapse, and dozens of moments in between. All on one kit lens, one battery, and one SD card.
The footage exists. The compilation needs to be edited.
What I Have
Enough clips across enough locations to build a 60 to 90 second Bodrum compilation with variety in light, mood, and subject. Morning golden hour to evening afterglow. Moody overcast to bright Bodrum sun. Wide establishing shots to tight 135mm portraits. Places and people.
The location threading between scenes gives the compilation a geographic structure. Antik Tiyatro to windmills to Gümbet beach. The castle seen from every angle and then from inside. The marina walked in both directions. The compilation can feel like a journey, not a slideshow.
What I Learned
About video: Manual exposure, the 180-degree shutter rule, white balance discipline, light direction, time of day, the ND filter and its limits, when to use f/8 and when to use f/5.6, tripod vs handheld, focal length series, slow motion, time-lapse, and how to hold still and let life enter the frame.
About myself: I started this wanting to film places. I ended up wanting to film people. The simit truck, Murat on the beach, the old woman at Kapıkırı, the kid herding cows. The 85mm candid moments from a distance. The places are the stage. The people are the performance. Photography taught me to see light. Video taught me to see life.
About the process: Every constraint taught me something. The kit lens forced me to understand exposure and aperture instead of throwing money at it. One battery forced me to be disciplined about when to shoot. The ND filter’s colour shift forced me to test, measure, and build a correction preset. The limitations made the learning stick.
Gear for Next Time
| Item | Why |
|---|---|
| Spare NP-FZ100 battery | One battery is a risk. Video drains it fast. Charging is slow. Non-negotiable. |
| Sigma 56mm f/1.4 DC DN (E-mount) | The portrait lens. f/1.4 at a portrait focal length for the people moments that turned out to be the best footage. |
| Spare SD card | Forgot it once. Never again. |
| 55mm filter wrench | For the stuck ND filter. Cheap insurance. |
| Lens cleaning wipes | Running low in Bodrum. Stock up before travelling. |
Settings for Next Time
| Setting | Change from this trip |
|---|---|
| Recording format | XAVC HS 4K, highest bitrate, 4:2:2, 10-bit. Not XAVC S at 60Mbps 8-bit. |
| ND filter approach | Avoid when possible. f/16 first. ND as last resort with Premiere Pro correction preset. |
| Lens hood | On by default. Only remove for ND filter. |
| White balance | Lock per condition. 5200K golden hour, 5600K daytime, 3200K indoor warm. No experimenting mid-shoot. |
The Compilation
The edit is the next chapter. Premiere Pro, Lumetri Color, the ND correction preset, cutting 3 to 5 seconds per clip, finding the rhythm, choosing whether to use music or ambient sound or both. That process will teach me as much as the shooting did.
I do not know what the final video will look like. I did not know what this trip would look like when I packed the camera. The process reveals the outcome. That is how every skill I have learned has worked.
Documented March 2026. Bodrum, Turkey.